TDD workflow with Docker
April 25, 2020
This is the fifth and final post in our Test-Driven Development journey for beginners. In this post, you’ll learn how to use Docker to build and run your tests.

Why Docker?
Docker is a platform based on container technology. In short, a container is a piece of software with all its dependencies. That means your TDD workflow won’t be affected. It doesn’t matter if you use Linux, MacOS, or Windows.
Because all you need is already inside a container.
Docker Benefits
Docker has many benefits. But the most important for embedded passionates are:
- Isolation: Every container is independent.
- Compatibility: Forget about it works on my machine.
- Do it once: This is very important. Because there are tons of different compilers. For Atmel, STM32, NXP, and many other microcontroller vendors.
Once your toolchain is Dockerized. Probably that you don’t have to set it up again ever.
- Simple and Easy: Docker containers are ready to run with one command. A typical workflow with Docker is like this. Code and run Docker.
That’s it.
If want to know more about how to set up your toolchain (compiler + linker) with Docker. Then read this post.
It’s time to learn how to Dockerize your testing tool ceedling.
Docker Terms
Let’s define some terms. So you can get everything quick.
- Docker Image: Binary file that includes everything needed to run an application.
- Container: Runtime instance of the image. Your application runs on a container.
- Dockerfile: File with commands to build a Docker image.
From here. I’ll show you the Dockerfile you’ll need. Then how to build your Docker Image. And finally how to run your Test container.
Create the Dockerfile
You can find the code on Github.
On your project root directory. Let’s say it looks like this.
$tree -L 1
.
├── code
├── Dockerfile
├── project.yml
├── RunTestOnDocker.sh
└── testbuild
You create a Dockerfile. The name is important..
Docker only recognizes files named as Dockerfile.
In your Dockerfile you add the following lines.
FROM ruby:2.5

# Set up a tools dev directory
WORKDIR /home/dev

# Packages that will be needed once
RUN gem install ceedling
What this Dockerfile does is:
FROM ruby:2.5is the “Docker Repository”. You’re “cloning” the reporuby:2.5(name:version).WORKDIR /home/dev. Each container has its filesystem. So you are setting your working directory. The directory where you plan to work inside the container.RUN gem install ceedling. You are installing ceedling in your container.
Now that you have your Dockerfile. Let’s create your Docker image.
Creating a Docker Image
Building a Docker image is super easy. Just run docker build -t IMAGE_TAG ..
$ docker build -t myimages/test .
NOTE: At the of the docker command there is a dot(.).
Sometimes you would need to have sudo or administrative rights to run Docker.
To verify my image was built. Run docker image ls.
$  sudo docker image ls
REPOSITORY          TAG                 IMAGE ID            CREATED             SIZE
myimages/test       latest              f62c445a5cfa        9 days ago          853MB
ruby                2.5                 991cc3a6e6a3        9 days ago          843MB
There are two images. Because myimages/test depends on the base Linux image ruby:2.5.
Now that you built your docker image. You are ready to go. You can start testing your code right now.
Running Tests with Docker
Running tests with Docker is easy. It’s just one command. docker run.
But there are some things you need to understand about that command.
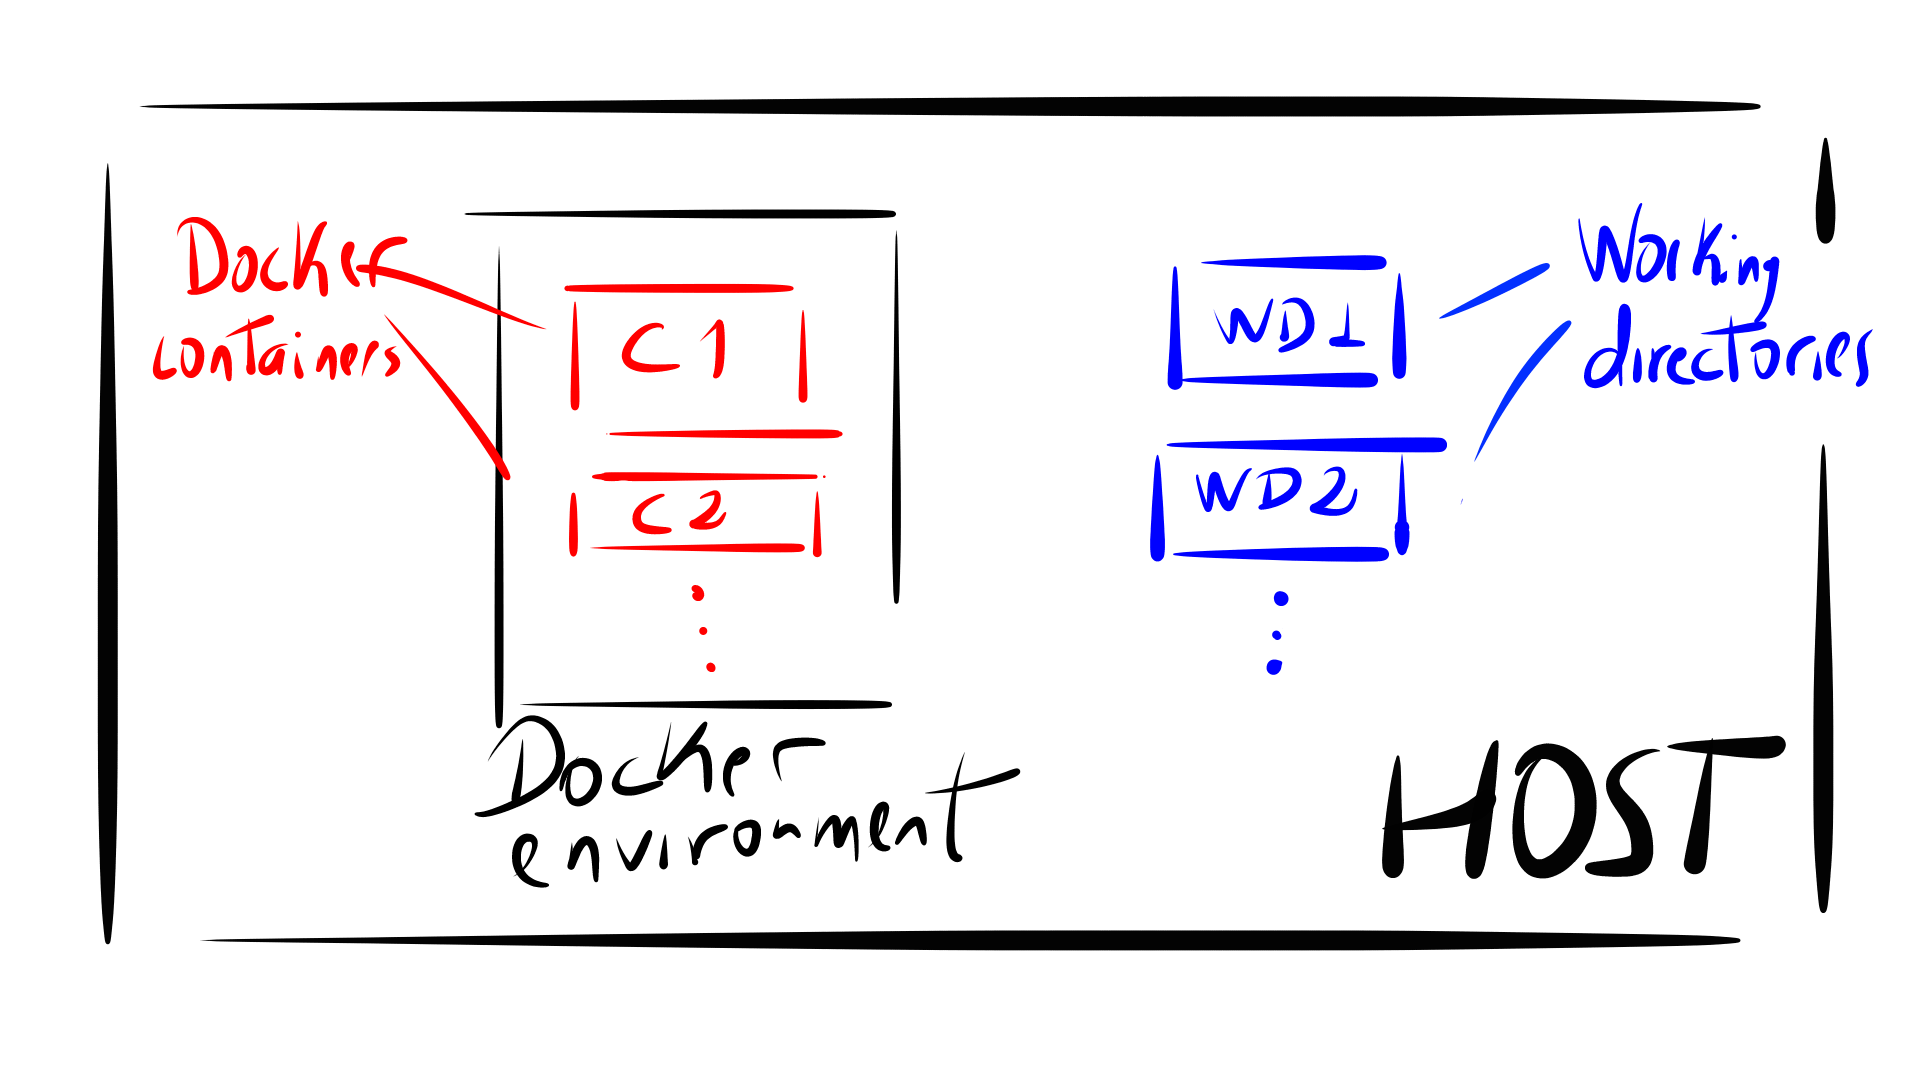
Docker Environment
In your Host machine will coexist the Docker environment and your files or working directories. Your containers run on the Docker environment. Check the next picture.
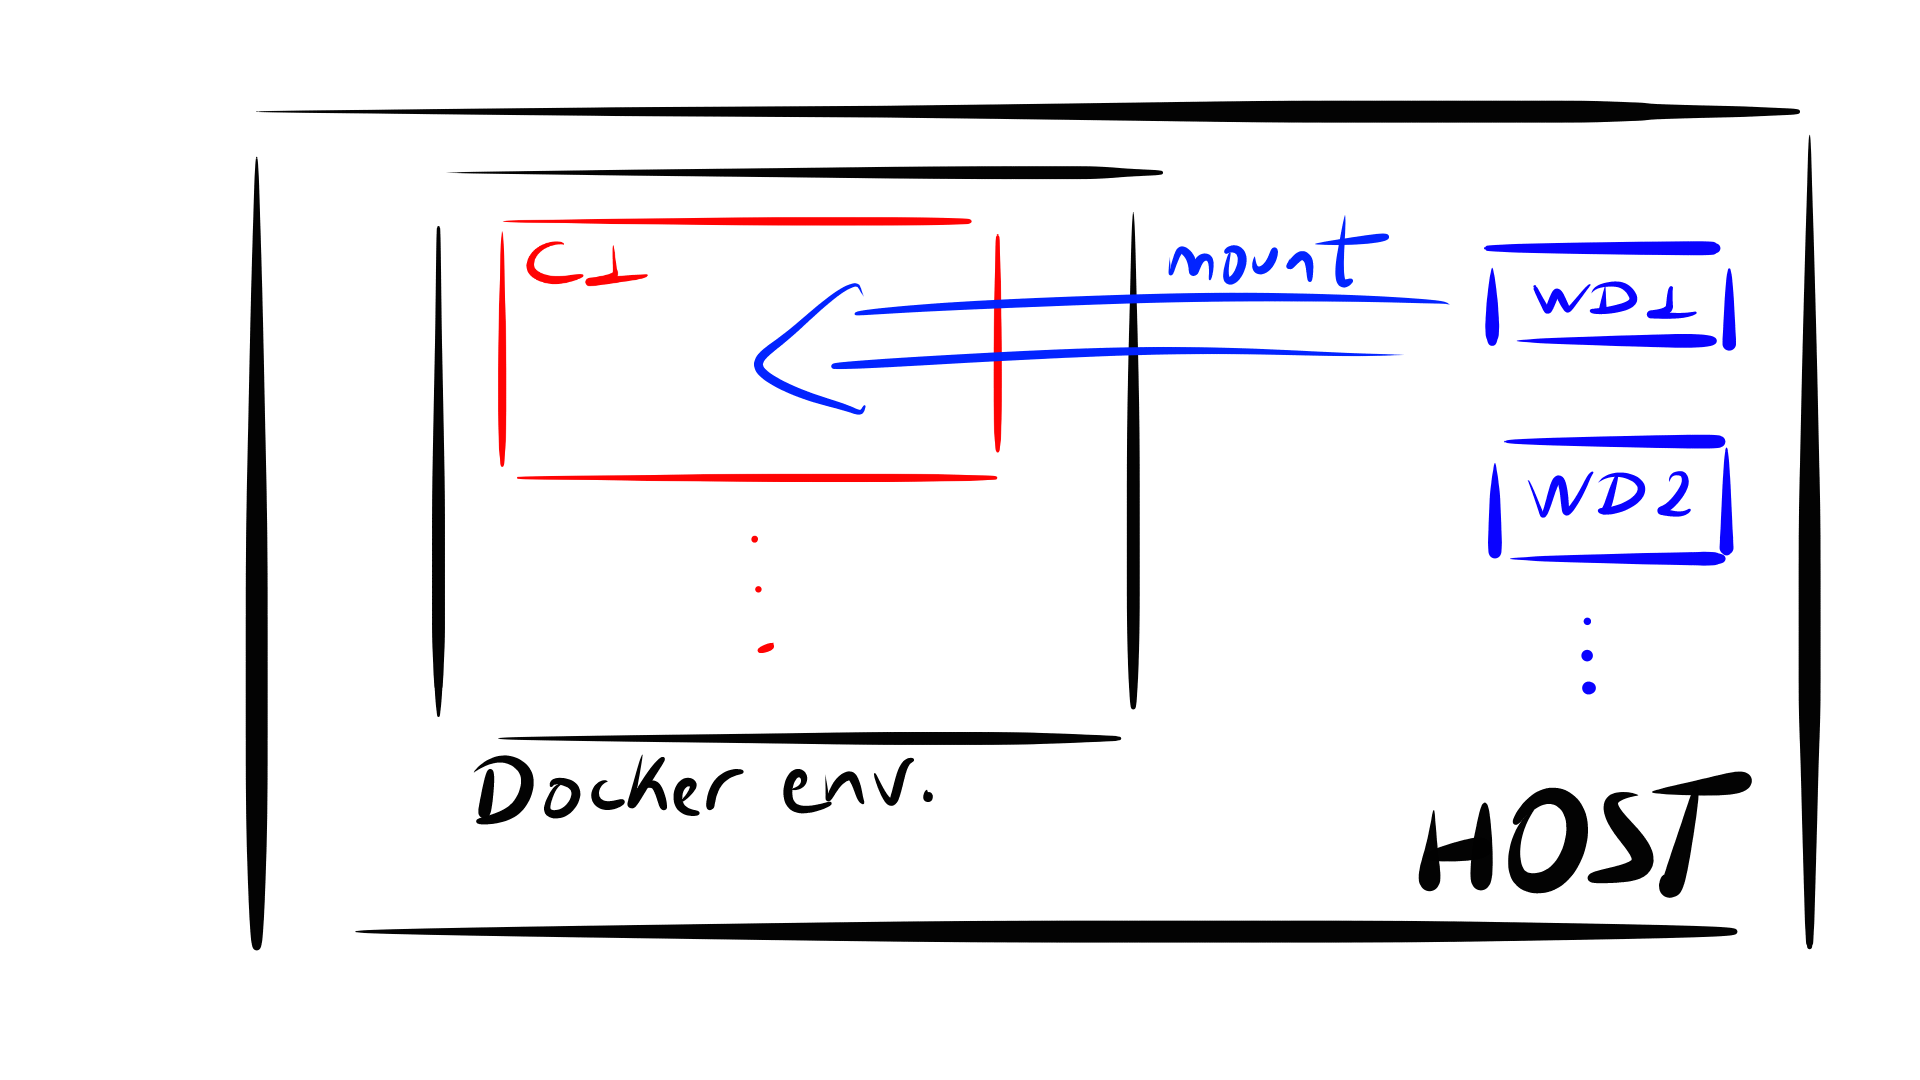
Mounting Directories on Docker
Let’s say you want to run your application. Your application directory is WD1. You want to run your tests on the container C1. To do so, you have to mount WD1 on the container.
In Docker it is done as follows:
docker run \
    -rm \
    -v SOURCE_DIR:VOLUME \
    --name CONTAINER_NAME \
    -w DOCKER_WORKDIR  \
    IMAGE \
    COMMANDS
A short explanation:
run: command to run a container.-rm: Automatically remove the container when it exits. The alternative would be to manually stop it and then remove it.-vor--volume: Mounts a local directory (WD1) on a Docker volume--name: Assign a name to the container, it’s useful for debugging or to recognize containers.-wor--workdir: sets the working directory of the container to where any commands will be executed.
Running Tests
Now that understand docker run.
Just execute the next command.
sudo docker run \
    --rm \
    -v $(pwd):/usr/src/myapp \
    -w /usr/src/myapp \
    --name my_container myimages/test
    ceedling clobber test:all
And you’ll get something similar to this.
Sending build context to Docker daemon  316.4kB
Step 1/5 : FROM ruby:2.5
 ---> 991cc3a6e6a3
Step 2/5 : WORKDIR /home/dev
 ---> Using cache
 ---> fca615d7777b
Step 3/5 : RUN ruby -v
 ---> Using cache
 ---> 3ab707d51504
Step 4/5 : RUN gcc -v
 ---> Using cache
 ---> 8d1a0a4dd926
Step 5/5 : RUN gem install ceedling
 ---> Using cache
 ---> f62c445a5cfa
Successfully built f62c445a5cfa
Successfully tagged test/local:latest
Switch to inspect mode.


Clobbering all generated files...
(For large projects, this task may take a long time to complete)


Test 'test_BusDriver.c'
-----------------------
Generating runner for test_BusDriver.c...
Compiling test_BusDriver_runner.c...
Compiling test_BusDriver.c...
Compiling unity.c...
Compiling BusDriver.c...
Compiling FakeBusDriver.c...
Compiling cmock.c...
Linking test_BusDriver.out...
Running test_BusDriver.out...

--------------------
OVERALL TEST SUMMARY
--------------------
TESTED:  1
PASSED:  1
FAILED:  0
IGNORED: 0
Summary
You saw the advantages of Docker. Application Isolation. Compatibility. Simple and Easy. You also learned how to run your test from a docker container.
Now you are ready to apply Test-Driven Development on your applications using Docker containers.
If you want to learn ever more about TDD. Then get one copy of Test-driven development for embedded C on Amazon.