Secure Boot for Embedded Devices - An Example
March 1, 2025
Secure boot is a critical security feature for embedded devices. It ensures that only authorized firmware runs on a device, protecting against unauthorized modifications or attacks. In this post, I’ll explain how secure boot works using a simple example.
- Chain of Trust
- Quick Security Concepts
- Secure Boot Components
- Secure Boot Process
- Example: Secure Boot Concept
- Simulating Secure Boot Verification
- Running the Simulation
- Conclusion
- References
Chain of Trust
Secure boot relies on the chain of trust—a sequence of steps where each step verifies the integrity of the next before executing it.
For example, in a boot sequence A -> B -> C, secure boot ensures that A verifies B, and B verifies C. If any step fails, the boot process is halted to prevent running untrusted code.
Questions you may have:
- Why should the firware be verified every time the device boots? Because the firmware can be tampered with or replaced, compromising the device’s security.
- Why multiple steps? Each stage has different privileges and responsibilities. Also you may update, for example, an application without modifying the OS or bootloader.
Quick Security Concepts
To understand secure boot, you need to be familiar with a few key concepts:
- Public/Private Key: A cryptographic key pair where the private key is secret, and the public key is shared.
- Encryption/Decryption: Data encoded with a public key can only be decrypted by the corresponding private key (and vice versa).
- Hash: A function that generates a unique fixed-size output for an input. Even a small change in input drastically alters the hash.
- Digital Signature: A hash encrypted with a private key.
- Signing/Verification: The process of signing data with a private key and verifying it with a public key.
Secure Boot Components
Secure boot involves the following components:
- Public/Private Key Pairs: Used to sign and verify firmware.
- Digital Signatures of Firmware: Signed binary files to verify authenticity.
- Firmware Files: The bootloader, OS Kernel, and Application code to be verified.
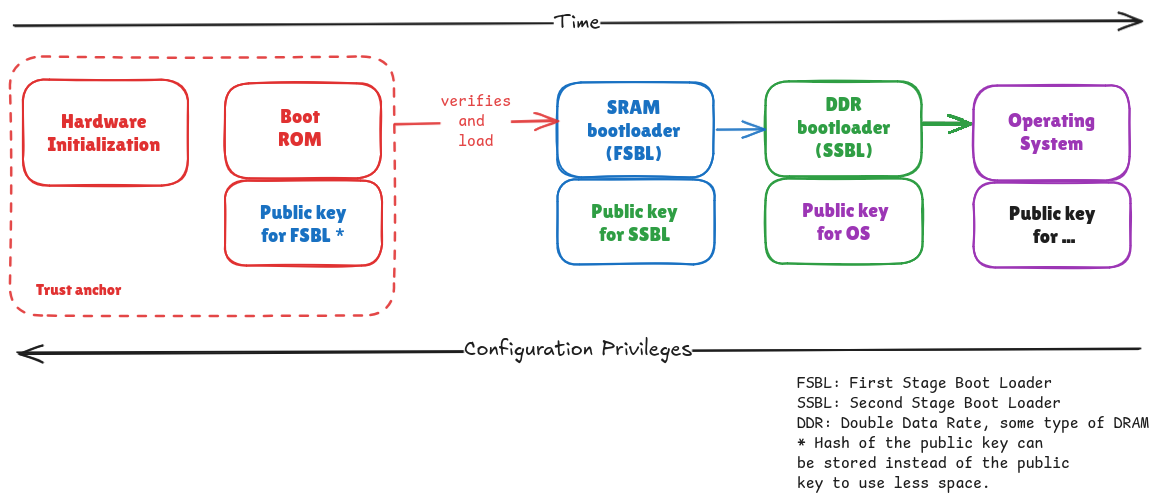
Secure Boot Process
Secure boot typically involves these stages:
- Boot ROM (in hardware): Loads the first-stage bootloader and initialize hardware components required in the next stage.
- First-Stage Bootloader (FSBL): A simple, immutable, secure bootloader that verifies and loads the second-stage bootloader.
- Second-Stage Bootloader: A more complex bootloader responsible for loading the OS and handling updates.
- OS Kernel: The core of the operating system.
- Application: The final software running on the device.
Questions you may have:
- Why multiple bootloaders? The second-stage bootloader is complex (handling tasks like OS loading and OTA updates) and may have vulnerabilities. The first-stage bootloader is kept simple, secure, and immutable, ensuring a reliable anchor in the chain of trust. In practice, you can update also the first-stage bootloader but it’s not desireable to do so.
- I usually got only with “signed” file instead of a digital signature plus binary file. Why? It’s common to embed the signature in the binary file for simplicity like in the case of U-Boot. However, in this example, I’ll keep them separate for clarity.
- Why don’t I see an encrypted firmware file during Secure boot? Firmware is encrypted while it’s being sent (like during an OTA update over a secure MQTT connection) and while it’s stored (like when you encrypt your hard drive). Also the encryption keys used for these are different from the ones used for secure boot. That’s because secure boot isn’t about keeping the firmware secret—it’s about making sure it hasn’t been tampered with and comes from a trusted source.
Example: Secure Boot Concept
For simplicity, let’s consider a setup with only an FSBL and an Application.
Step 1: Generate Keys
We generate two key pairs—one for the FSBL and one for the Application.
openssl ecparam -genkey -name prime256v1 -noout -out root_private.pem
openssl ec -in root_private.pem -pubout -out root_public.pem
openssl ecparam -genkey -name prime256v1 -noout -out second_private.pem
openssl ec -in second_private.pem -pubout -out second_public.pem
Step 2: Store FSBL Public Key Hash
openssl dgst -sha256 -binary root_public.pem | openssl base64 > OTP.txt
Step 3: Sign Bootloader
echo "bootloader code" > bootloader.txt
openssl dgst -sha256 -sign root_private.pem -out bootloader.sig bootloader.txt
Step 4: Sign Application
echo "application code" > application.txt
openssl dgst -sha256 -sign second_private.pem -out application.sig application.txt
I created a script (setup.sh) to automate these steps:
#!/bin/bash

# Root Key Pair
echo "[*] Generating root and second key pairs"
openssl ecparam -genkey -name prime256v1 -noout -out root_private.pem
openssl ec -in root_private.pem -pubout -out root_public.pem

# Second Key Pair
openssl ecparam -genkey -name prime256v1 -noout -out second_private.pem
openssl ec -in second_private.pem -pubout -out second_public.pem

# Store the root public key hash in a file
echo "[*] Storing root public key hash in OTP.txt"
openssl dgst -sha256 -binary root_public.pem | openssl base64 > OTP.txt

# Create bootloader.txt
echo "[*] Create bootloader.txt"
echo "bootloader code" > bootloader.txt

# Sign bootloader.txt with root private key
echo "[*] Signing bootloader.txt with root private key"
openssl dgst -sha256 -sign root_private.pem -out bootloader.sig bootloader.txt

# Create application.txt and sign it with second private key
echo "[*] Signing application.txt with second private key"
echo "application code" > application.txt
openssl dgst -sha256 -sign second_private.pem -out application.sig application.txt
Simulating Secure Boot Verification
The following script (secure_boot.sh) checks each step before executing it:
#!/bin/bash

set -e  # Exit on error (remove this if you want to continue on failure)

# File paths
ROOT_HASH_FILE="OTP.txt"
BOOTLOADER_FILE="bootloader.txt"
BOOTLOADER_SIG="bootloader.sig"
APPLICATION_FILE="application.txt"
APPLICATION_SIG="application.sig"
ROOT_PUBLIC_KEY="root_public.pem"
SECOND_PUBLIC_KEY="second_public.pem"

echo "[*] Starting Secure Boot Verification"

# Step 1: Verify Root Public Key Hash
echo "[*] Checking root public key against OTP memory"
computed_hash=$(openssl dgst -sha256 -binary "$ROOT_PUBLIC_KEY" | openssl base64)
stored_hash=$(cat "$ROOT_HASH_FILE")

if [ "$computed_hash" != "$stored_hash" ]; then
    echo "FAILED on root public key verification"
    exit 1
fi
echo "[+] Root public key is valid"

# Step 2: Verify Bootloader Signature
echo "[*] Verifying bootloader signature"
if ! openssl dgst -sha256 -verify "$ROOT_PUBLIC_KEY" -signature "$BOOTLOADER_SIG" "$BOOTLOADER_FILE"; then
    echo "FAILED on bootloader signature verification"
    exit 1
fi
echo "[+] Bootloader signature is valid"

# Step 4: Verify Application Signature
echo "[*] Verifying application signature"
if ! openssl dgst -sha256 -verify "$SECOND_PUBLIC_KEY" -signature "$APPLICATION_SIG" "$APPLICATION_FILE"; then
    echo "FAILED on application signature verification"
    exit 1
fi
echo "[+] Application signature is valid"

echo "[SUCCESS] Secure boot verification completed"
Running the Simulation
Run the setup and secure boot scripts:
bash setup.sh
bash secure_boot.sh
Expected output:
[*] Starting Secure Boot Verification
[*] Checking root public key against OTP memory
[+] Root public key is valid
[*] Verifying bootloader signature
Verified OK
[+] Bootloader signature is valid
[*] Verifying application signature
Verified OK
[+] Application signature is valid
[SUCCESS] Secure boot verification completed
Testing Failure Cases
If you modify root_public.pem, the root public key verification fails:
FAILED on root public key verification
If you modify bootloader.txt with unauthorized content, the bootloader verification fails:
FAILED on bootloader signature verification
If you modify application.txt, the application verification fails:
FAILED on application signature verification
Conclusion
Secure boot ensures that only trusted firmware runs on a device. This post covered the chain of trust, key security concepts, and a working example of a simple secure boot implementation.
Understanding and implementing secure boot is critical for securing embedded devices against tampering and unauthorized code execution. Hopefully, this post made the concept clearer and easier to grasp.
References